Microsoft Creative Writer – update #1

A probably unachievable project: recovering some UX assets from a Microsoft Kids software that I was (and still am) obsessed with: Creative Writer.

I’ve recently found out that a few years ago Microsoft released the source code of 3D Movie Maker and I started peeking around. There’s still a very active 3DMM community and they reverse-engineered a lot of stuff, and I was wondering if maybe this could help me in recovering those assets. I thought they may be sharing the same engine since the first version of Creative Writer I’d like to work on was released in 1994 and 3DMM followed in 1995 (but development started in 1993).

The software is super tiny, it came on 4 floppies and it takes up 8MB installed on disk, just a bunch of files… like 8 files. The assets (like icons, backgrounds, UX objects) must be in those files. I opened one of them in an hex editor:

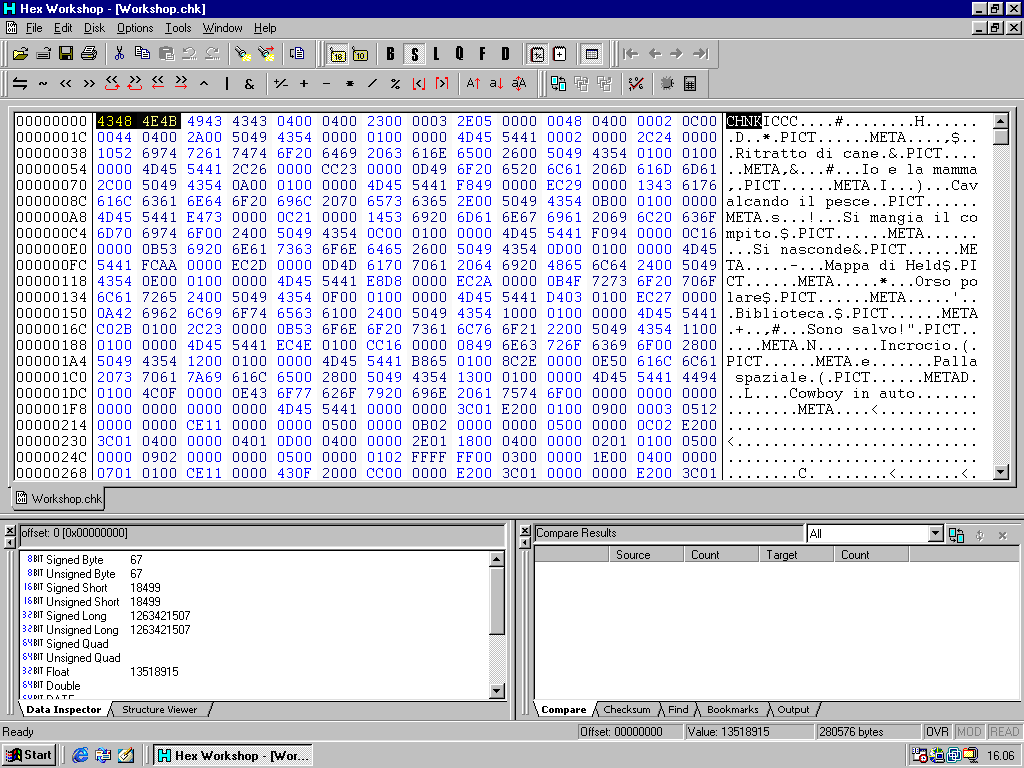
I can literally see the content in this .chk “chunky” file, it’s there, I can see the .PICT too. What now?

On 3dmm.com I found a little tool called Chunk Extractor. My original idea was to use an old operating system to do all of this (Windows 98 SE) but all these tools require a more modern operating system (I also tried on XP but still a no). I run it on Windows 10 but unfortunately the file has a slightly different format from the one used in 3DMM and the software complains and throws an error.

I tried another tool, pymaginopolis, a collection of tools for reverse engineering 3DMM. The README states that it can disassemble Creative Writer 2 chunks too so I tried.

To setup the environment clone the repo and run this:

python -m pip install setuptools

then from the repo root dir:

python -m pip install -e . 

The repo was last updated in 2021 and I needed to fix a couple of things to make it work on my workstation with Windows 10 and Python 3.14.4 — lazy me, I didn’t want to get up and go get my Thinkpad… don’t judge me.

In the util.py file I updated a couple of lines:

import importlib.metadata as pkg_resources
version_number = pkg_resources.version("pymaginopolis")

and run the script:

py -m pymaginopolis.tools.disassembler "C:\Users\compuk\Desktop\MSKIDS\SHARED\STUFF\WORKSHOP.CHK"

but nope, the file format is definitely different:

File "C:\Users\compuk\Desktop\pymaginopolis-master\pymaginopolis\chunkyfile\loader.py", line 25, in parse_file_header
    raise FileParseException("Bad file header magic: expected CHN2, got %s", file_magic)
pymaginopolis.chunkyfile.common.FileParseException: ('Bad file header magic: expected CHN2, got %s', b'CHNK')

I need to dig a bit deeper here. I have absolutely no idea about any of this. I’m figuring it out as I go, I know nothing about programming. I’ll keep posting updates if I manage to make any progress.

Cannot read photos taken with Mavica, apparently corrupted

Shout-out to the people having this problem (including the future me), here’s the situation: you take pictures using a Sony Mavica (I use an FD75), you can view them in-camera, but when you try to download them to a PC they show up as corrupted.

I thought it was a Windows 10 problem, I tried with XP to no avail, same with macOS and OpenSUSE. There was no way I could open the files but using Linux I was able to see these:

It looked like something related to bad formatting or something similar, so I dumped the floppy using dd and ran a dosfsck. It tried to fix most of the errors: long file names, sparse files, truncating things… honestly, I don’t really know.

Once the image was fixed, I dumped it onto another floppy, inserted it into the camera and—well, the pictures were there… but I still couldn’t load them on any computer, so the image was probably still trash.

The Mavica has a copydisk function that copies a floppy; apparently, it has enough space to hold the entire disk in memory and then write it onto another one. But… I found out it does a raw copy, so I was just cloning trash again.

The solution was to select the photos one by one and use Mavica’s copy function, which works similarly to copydisk but copies individual files onto another floppy instead of the whole (corrupted) disk. Finally, the photos were accessible from every computer.

Notes on formatting: formatting a floppy with Windows doesn’t cause any weird behavior with disk geometry. The floppy I was having issues with was formatted in msdos using a Mac. Of course, you can also format directly in-camera (which is probably the best option at this point). After the recovery, I also tried reformatting it using OpenSUSE, which made things even worse—the floppy became completely unreadable, to the point where Dolphin kept crashing. I had to reformat it in-camera, which took a bit, but worked like a charm.

VMTools on Windows 2000

To be able to install VMWare Tools on a Windows 2000 machine you also need to install this KB:

If you experience further issues with drivers installation (“Driver installation program does not install device drivers”), you should also install this one:

This KB will work only if you’re using the ENG version. If your Windows is localized, good luck finding the proper one…

Pretty Git

Set the pretty format:

git log --color --graph --pretty=format:'%Cred%h%Creset %Cgreen(%cr) %C(bold blue)<%an>%Creset -%C(yellow)%d%Creset %s' --abbrev-commit

Create an alias:

git config --global alias.lg "log --color --graph --pretty=format:'%Cred%h%Creset %Cgreen(%cr) %C(bold blue)<%an>%Creset -%C(yellow)%d%Creset %s' --abbrev-commit"

REXX: credit card number generator and validator

This REXX program generates credit card numbers (16 digits – no Amex), checks if the number is valid using Luhn algorithm and prints it to OUTDD.

/**************************** REXX *********************************/

"FREE FI(outdd)"
"ALLOC FI(outdd) DA('Z00324.OUTPUT(CUST16)') SHR REUSE"

out_ctr = 0                    

valid_count = 0
DO WHILE (valid_count < 500)
  CALL GENERATE
  ccvalid.1 = randomcc
  CALL LUHN                   
    IF LUHN(ccvalid.1) THEN
      DO
        "EXECIO 1 DISKW outdd (STEM ccvalid. "
        out_ctr = out_ctr + 1        
        valid_count = valid_count + 1
      END
END
IF out_ctr > 0 THEN             
  DO                               
  "EXECIO 0 DISKW outdd (FINIS" 
  SAY 'File outdd now contains ' out_ctr' lines.'
END
ELSE                         
  DO                         
   "EXECIO 0 DISKW outdd (OPEN FINIS"  
   SAY 'File outdd is now empty.'
   END
"FREE FI(outdd)"
EXIT

GENERATE:
DO x=1 to 4 by 1
  randomdig.x = RANDOM(1000,9999)
END
randomcc = randomdig.1 || randomdig.2 ||  randomdig.3 || randomdig.4
RETURN

LUHN:                     
  sum=0                                
  even=0                               
    DO i=length(randomcc) TO 1 BY -1   
    c=SUBSTR(randomcc,i,1)             
  IF even THEN DO                      
    c=c*2                              
    IF c>=10 THEN                      
      c=c-9                            
    END                                
  even=\even                           
  sum=sum+c                            
  END
RETURN right(sum,1)=0                  

DisplayCAL on Fedora 34

DisplayCAL relies on Python2, which is not supported since Fedora 32.

You can download the required packages compiled for Fedora 31, that will work for versions 32/33/34:

  • python2-wxpython
  • puthon2-gobject-base
  • python2-gobject
  • DisplayCAL
wget https://archives.fedoraproject.org/pub/archive/fedora/linux/releases/31/Everything/x86_64/os/Packages/p/python2-wxpython-3.0.2.0-26.fc31.x86_64.rpm https://archives.fedoraproject.org/pub/archive/fedora/linux/releases/31/Everything/x86_64/os/Packages/p/python2-gobject-3.34.0-3.fc31.x86_64.rpm https://archives.fedoraproject.org/pub/archive/fedora/linux/releases/31/Everything/x86_64/os/Packages/p/python2-gobject-base-3.34.0-3.fc31.x86_64.rpm https://rpmfind.net/linux/fedora/linux/releases/31/Everything/x86_64/os/Packages/p/python2-gobject-3.34.0-3.fc31.x86_64.rpm https://displaycal.net/download/Fedora_31/x86_64/DisplayCAL.rpm

Creating ISO from CD

[compuk@mashiny] ~$ isoinfo -d -i /dev/cdrom 
CD-ROM is in ISO 9660 format
System id:
Volume id: MSCW02_I_01
Volume set id: MSCW02_I_01
Publisher id: MICROSOFT CORPORATION
Data preparer id: MICROSOFT CORPORATION, ONE MICROSOFT WAY, REDMOND WA 98052, (206) 882-8080
Application id: CDIMAGE V2.12 (01/24/96 TM)
Copyright File id:
Abstract File id:
Bibliographic File id:
Volume set size is: 1
Volume set sequence number is: 1
Logical block size is: 2048
Volume size is: 188766

Joliet with UCS level 3 found
NO Rock Ridge present
[compuk@mashiny] ~$ dd if=/dev/cdrom of=~/Desktop/CreativeWriter2.iso bs=2048 count=188766 status=progress
384817152 bytes (385 MB, 367 MiB) copied, 172 s, 2,2 MB/s
188766+0 records in
188766+0 records out
386592768 bytes (387 MB, 369 MiB) copied, 172,618 s, 2,2 MB/s

Manually booting a Linux Kernel

After updating a server, rebooting it to load the new Kernel, removing the old Kernel and rebooting again, I got the GRUB minimal BASH-like prompt (I still can’t understand why, honestly), as if GRUB wasn’t able to see any info on how it should load the Kernel and the OS.

I know I could be very distracted but deleting all the Kernels seemed a little too much so I tried to manually boot the Kernel.

First, I checked what GRUB could see:

grub> ls
(hd0) (hd0,msdos1) (hd0,msdos2)

Listed the content of the disks to see what files were present and determine which one was the root filesystem:

grub> ls (hd0,1)/
lost+found/ vmlinuz-5.10.21-200... initramfs-5.10.21-200....img vmlinuz-0-rescue... initramfs-0-rescue....img

Set it as boot volume:

grub> root=(hd0,msdos1)

Loaded the Kernel image and RAM disk:

grub> linux /vmlinuz-5.10.21-200... root=/dev/sda1
grub> initrd initramfs-5.10.21-200....img

And finally booted the system:

grub> boot

Just in case, I also created a new GRUB config based on the currently running system:

grub2-mkconfig -o /boot/grub2/grub.cfg